Navigation Menu
Ah yes, that old adage. “...but teach a man to fish, and he will feed himself forever. “
By this point, you know that it’s my way to show you how to figure all this stuff out for yourself. The last thing I want to do is just lay down the law: THIS IS HOW IT IS! OBEY!
I would rather teach you how to fish.
However, some of you may not have patience for my convoluted fishing lessons.
In that case, this is the page for you. When someone asks me how to get more power from their engine, I usually send them this file which I have saved: how to build a 120HP RG motor v1_1.pdf
No kidding, you will have a new animal on your hands if you follow that recipe. There are a few things that will make this a lot harder, though: I think that Mark Dent’s pipes or Darcy’s pipes are massively more effective than any RG pipe you can buy- certainly, Darcy pipes are in a completely different league compared to any other pipe I have used . Try the recipe with another set of pipes and take 10-15 HP off the top. Switching to Darcy pipes immediately boosted me 13-14 HP above where I was with swarbrick pipes, just to put that in perpective.
Download the specs here: PAC-Darcy pipes.xls. That’s an excel file with a pipe angle calculator, preloaded with the exact specs of the Darcy pipes.
OK, you don’t want to weld up a set of unbelievably fantastic pipes? On a tight budget? Want to get the most bang for the buck from your Gamma?
Here’s the plan. And it’s very similar to the 120 HP plan.
Let’s eliminate the variables- you don’t get 100+ HP thru blind luck. You MAKE it run well because you have controlled ALL of the variables.
1) You need a very good ring seal. Like new, let’s just say. If you have a tired old motor with 105 psi of compression, quit wasting your time! We’re not here to see how fast your nag can run. You want to make it run well? Make sure you have a good foundation. Get a leakdown tester and don’t come back until you have less than 4% leakage on all cylinders! Also make sure pistons fit in the bore properly, and your cranks are in tolerance. You may need to re-ring it. You may need to put pistons in it. Stressing a shagged-out motor with a lot of blowby is a great way to seize your motor and destroy it. Is that hone and ring job starting to look a bit more economical? Souping up a crappy top end is a false economy. Omigosh, I’m just laying down the law.
2) Your cases need to seal. Vacuum and pressure check your cases. You just want to skip this step? OK- do you KNOW that your cases do not leak? Or, are you just “hoping” that they seal well? Just hoping, eh? Not good enough. Come back when you can tell me your engine seals up like it’s supposed to. Need info on doing a pressure test? here pressure testing 1.pdf and here pressure testing 2.pdf
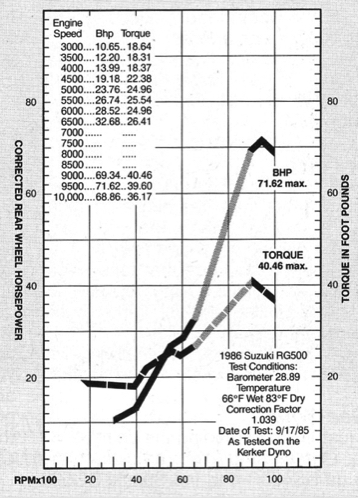
3) Exhaust system. Believe it or not, the stock exhaust is awfully good. I made 106 HP with the stock exhaust system. All I did to fix them up, was take the screening and crap out of the lower pipes. Like this gutting the lower pipes.pdf
Glue your pipes on, by the way- I use a bit of hi temp silicone. Unless you’re replacing those exhaust gaskets each time... leaks in the exhaust flanges will hurt the pumping action. Glue em! And clean out all the carbon from those exhaust pipes. It’s like a fluffy coating of wave-absorber in there.
4) Heads- squish clearance. For any RG, I'd start with closing up the squish clearance. I tend to be cautious
here, others go tighter. .8- 1mm is the range. No need to reshape things, just cut the head surface till the squish clearance is in spec. Check all four cylinders with solder in an X shape, by removing and reinstalling the heads with a used head gasket. Solder lies parallel and perpendicular to the wrist pin. Darcy told me that! You will see ~ 150 psi at kickover on an accurate gauge. About 15-25 psi more than stock. While you’re at it, remove all the accumulated carbon from the SAEC cavity in the heads.
5) Cylinders and porting. Widen exhaust port to 41mm and raise 1.5mm. A more squarish shape is OK. Only port if you have done this before! (Successfully, BTW) I would just stay away from the transfers, unless they are an obvious, horrible mismatch to the liner. I sent my cylinders to Eric Gorr- he made the transfers beautiful. Just a thought. Match/grind the SAEC valve so it lies flush with the roof of the port, when it is in high rpm position. Make sure that SAEC valves are in correctly, turn freely and operate correctly.
6) Intake - carbs. Bore the carbs to 31.5mm and grind the outer covers to match. You can leave the hole alone going into the case. Use an aftermarket or home-made individual filter system. You will have to rejet, so it might be simplest to buy a whole kit.
7) Intake- disc valves. Cut the closing side of the discs to finish closing at 70 degrees ATDC. Chamfer the leading edge of the disc so that it is rounded, not sharp, while you’re in there.
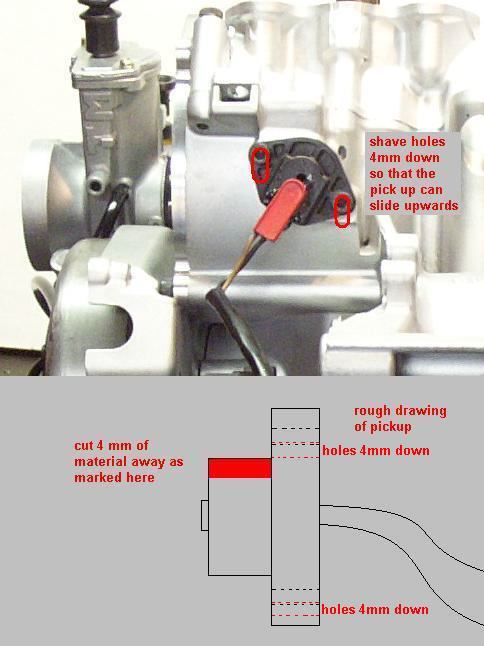
8) Ignition. Modify the pickup to allow 4 degrees of extra advance. You may only need 3 degrees. Test this cautiously but it will almost surely add power up thru the peak, and will make the engine fall off a bit more quickly after peak. Test it and see what it does. How to modify the pickup: how to shave the pickup.pdf and graphic pickup-mod.jpg
So here's a little bit more about timing. Download and read this article on how to develop an optimized advance curve: Frits Overmars on Advance curves. You will want 14 deg at your power peak for maximum results. Of course, this steps you closer to risk of engine damage from poor fuel, air leaks, etc.
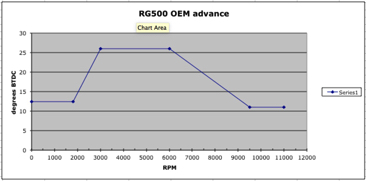
The stock RG timing curve looks like this (left margin). It hits 14 degrees around 8900 RPM and falls from there. It's at 11 degrees by 9500 RPM and stays flat after that. So, if you put on a set of pipes and move your power peak up to 10,000 or 10500 RPM, you do realize you're dealing with about 3 degrees less advance than optimal by the time you get to your power peak. In fact, you're giving up power and torque all the way. The stock timing curve IS optimized... for a bike that peaks around 9000 RPM. Sort of like, oh, I don't know.... a stock RG500. (on the left)
Of course, your plug caps have been checked and are within spec. Or just throw them away and get a fresh set of NGKs : waterproof ngk plug caps part no TB05EMA, uses std plug nipple. Throw out those crappy old plugs and drop in some new, W27ES-ZU ND plugs. Test all the new plug caps with an ohmmeter.
So, now it’s really really fresh, seals well, has good compression, tight squish clearance, cleaned and gutted pipes, improved exhaust port, longer disc timing, advanced ignition timing, bigger carbs, free-flowing filters, exhaust valves that are verified as working, and nice new plug caps that are all in spec atop nice new plugs. You ARE going to notice a difference. Will it be 100HP, who knows. I made 106 with the above mods, plus 35mm carbs. I bet you will be shooting for 100 with 31.5 carbs and the rest of those mods.
Of course, if you put new rings in it, you broke it in properly- Break In Secrets--How To Break In by MotoMan.pdf or break-in procedure -top end.pdf or The_Break-In.doc
Have fun! I will post more engine tech articles as time allows. If you want more, start digging through those two stroke tech links that I posted. There’s a ton of info out there.