Henrik Jørgensen's home-made hybrid
This story can be downloaded as a PDF here, with photos inline as originally written. This bike is FOR SALE
The Suzuki Polaris 800 Project
Randy Loki has kindly asked me to write about my 2t projects on his new RG Resource site, which I`m more than thrilled to do! I`ve been studying his Resource site from the moment I bought my RG500 around 2014, and he has impressed me with how thoroughly he documents every modification and dynotests. I know he has been the “RG500 Wikipedia” for most RG owners in Norway who wants to improve or modify their bike.
Okay, for those who don`t know me, my name is Henrik Helmers Jørgensen, I`m 43 years old and live in Norway. I work as a mechanical engineer, but I`m actually an aircraft engineer.
I`ve always been interested in 2-stroke engines. It started with some affordable 2 strokes in 94. A couple of years later, I started to race on track. At first with an RGV250 and later a Honda RS250 NX5. The Honda was a magnificent bike, and I raced it for some years before I started studying at the university.
Many years and bikes later, I managed to get hold of a Bimota 500 Vdue from Germany. Man, that was something I had dreamed of for a decade! However, the trouble started on the return home from Germany. When arriving in Norway after a long travel and a lot of problems during the ride home, I was very unsure if I had done the right thing by replacing my Ducati 1098s with a 2-stroke bike which barely ran…
Why am I telling you this when this story should be about the 800cc snowmobile engine powered bike? Well, the Bimota made me dig in to 2-stroke theory and after some years, I have ended up with an RG500, a TZR500 and the Suzuki Polaris 800. I`m also assembling a Vdue, again. I never learn 😊
Engine:
So, let`s start with the Suzuki Polaris 800! The inspiration of building this bike came from Dr. Robin Tuluie, which was the creator of the Tularis. I came over this project searching for some 2t stuff on the internet, and I was very fascinated by reading about the project. I know he also made a 500 based on the Honda CR500 engine before the Tularis. When working on the project, Dr. Tuluie was head of the Renault Formula 1 R&D Team. I mailed him some questions, and he answered gladly😊
There was also another bike utilizing a Polaris snowmobile engine, which was called the Melly-bike. This bike is also fantastic, but I`ve never heard they raced it at any point. I know they struggled with the belt-drive..
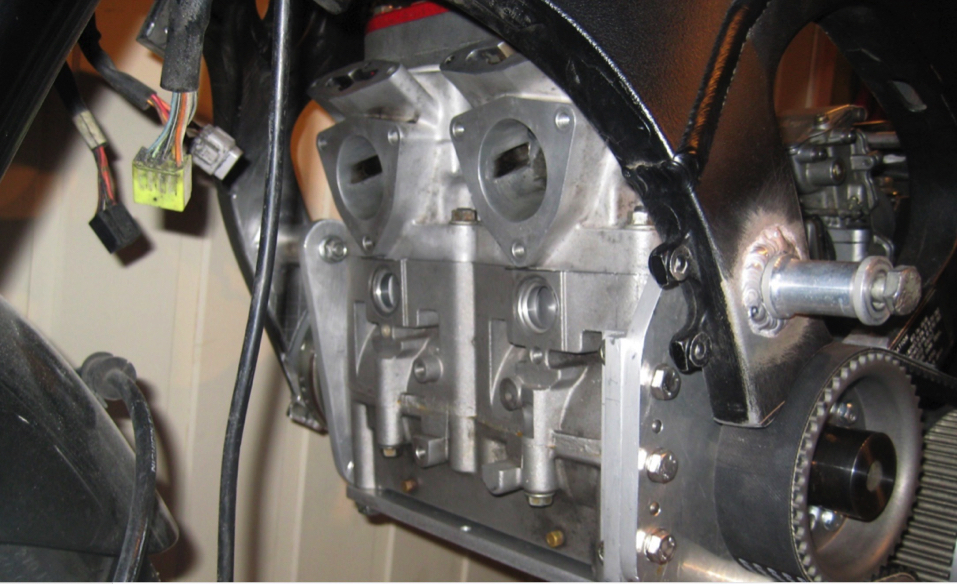
The engine I have used is a 2002 Polaris RMK800, which was called the Liberty engine. In standard trim it has 138HP and a bucket of torque! It`s an inline 2-cylinder engine with carbs on the rear side and exhaust on front. In a sled, it has a variator mounted on the left side and a flywheel with alternator on the right side. It has pneumatic guillotine exhaust valves. The engine is quite wide, so I needed a wide chassis to fit the engine and 40mm carbs inside the frame.
Suzuki Polaris 800 Hybrid


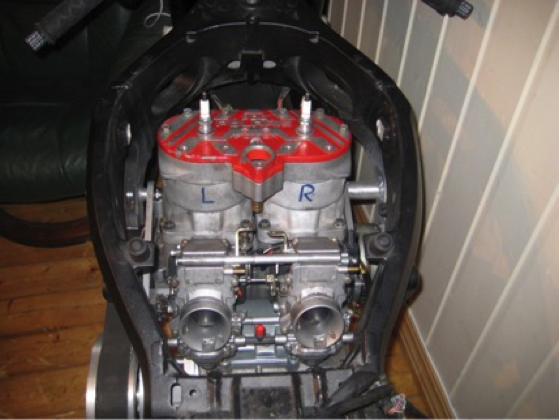




Chassis:
I found a 2006 Suzuki GSXR on the local “mobile” page which had a Lithuanian plate on it. I went to Oslo and picked it up. Riding the bike back home, I wondered if I really should destroy this fully operational sport bike, but my sense soon disappeared 😊 Next day, I was parting the bike to start the project.
Transmission:
One of the major challenges with installing a snowmobile engine is finding a separate motorcycle transmissions to use with it. I did not want to have a variator, so I started searching for a separate motorcycle gearbox. That turned out to be very difficult to find. BSA used a separate gearbox and Harley Davidsen. Both alternatives where no-good, but I had to use one of them, so I choosed a Harley Davidsen FXR tranny. I actually looked into design and fabricate my own custom gearbox, but it would have been too expensive, since I would have to outsource the whole side project.
In my workshop or rather garage, I have limited access to machining tools. I have a lathe and I bought a AC/DC Tig welder prior to the project. The Suzuki Polaris 800 project was actually my first experience with aluminium welding.
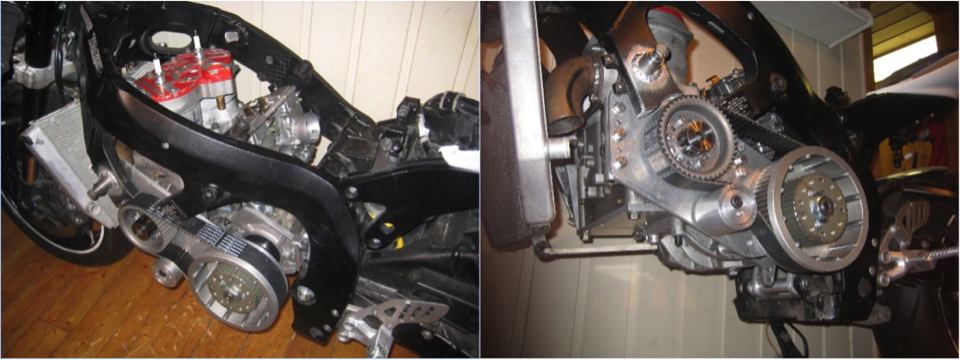
With the FXR transmission in house, I started to work on how I could assemble the engine to the gearbox. The Polaris engine has only 4 holes with threads on the bottom of the engine case. In a sled, the engine is installed in a cradle supported by 4 rubber mounts. This was something that back-fired later in the project. The FXR tranny is quite small, but heavy. It has both the clutch and the sprocket shaft on the left side, which was perfect for using a belt drive between engine and outer clutch basket.
When the engine rotates anti-clockwise, the sprocket turns the right way. The sprocket axle is actually outside the gear/clutch axle on the FXR tranny. Because of this, I could position the engine the same way as in a sled.
When that is said, I`ve heard that you can get HD transmissions with sprocket axle pointing left or right. With the engine positioned this way, I had space fore the carbs inside the frame and the fat, twin exhaust pipes from SLP could be positioned below the engine.
Before I concluded with the HD tranny, I contacted Polaris to ask if it was possible spinning the engine in clockwise direction instead of anti-clockwise. They confirmed that it was possible, if you changed the position of the ignition pick-up. You would maybe loose a few HP, but possible to do. Interesting!
Well, the tranny and engine had to be assembled some way, so I started cutting off excessive material to make the tranny shorter. I made a flange at the rear where I installed threads for bolting a bracket. The bracket would function as the rear engine mounts. On the front end of the tranny, there where two attachment bolts. I made a stiff aluminium plate under the engine case which connected engine and tranny.
Let alone, this would not be sufficient to take up all the forces between engine and tranny, so I made another aluminium bracket, mounted on the side of the engine, between engine and tranny. As the engine was much wider than the tranny, I made a bearing house and installed a bearing to support the clutch/gear axle. The bearing house was then bolted to the aluminium plate. The Alu plate also worked as the forward left engine mount. Now the engine and tranny where assembled to one power plant!
Belt-drive:
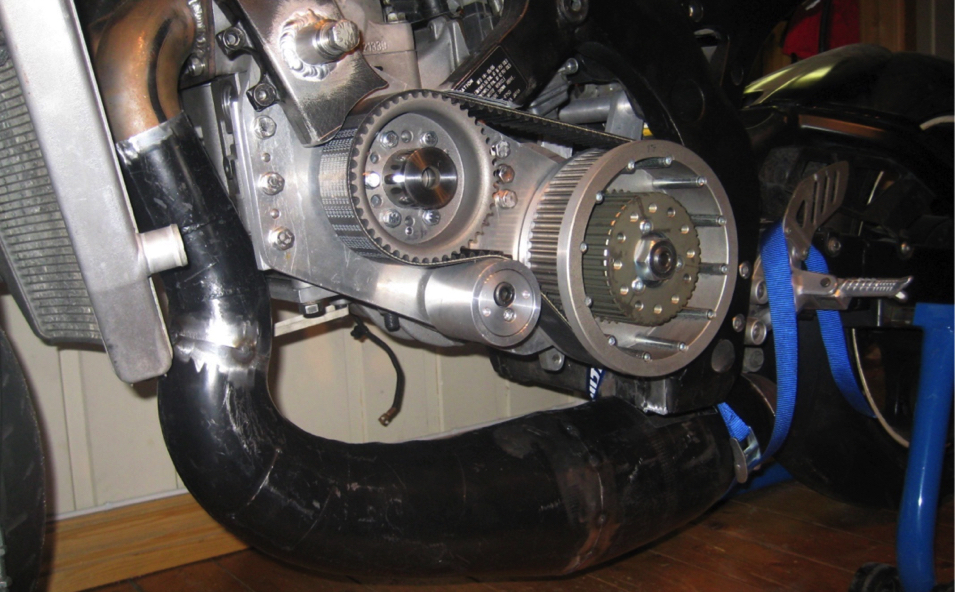
I also needed to find a belt and pulleys which could handle the massive power and torque of this engine. I searched on ebay for HD tranny and clutch parts, and I found a used 2” BDL kit from Russia 😊
I bought it and as soon as I received it, I started to modify it to fit my new powerplant. If I remember correctly, I had to make the width of the clutch pulley smaller and I needed to add a stop ring to keep the belt in position. In the kit, there where also a pulley for the engine. To get the primary ratio correct, I should have studied this more, however it works fine for now.
The best way to mount the pulley to the crankshaft was to utilize the center of the Polaris variator which was tapered. I cut and modified it and made a flange to fit inside the 2” pulley. Once assembled, I knew what belt length to use.
Getting a proper belt with correct length, width and strength was not easy. I settled with a Goodyear Falcon HTD-8, aramid enforced belt, which had the needed strength. The length was a bit off, so I installed an adjustable belt tightener.
Forward engine mounts and welding:
As I mentioned earlier, this was my first welding project. I learned the hard way that the aluminium surface must be properly cleaned and surface prepared for welding, before you start. Welding forward engine mounts on the Suzuki frame was a fucking hell at the beginning. Excuse me for my language, but it was really a pain in the ass, before I understood how to do it. I welded an aluminium sleeve on each side of the frame which worked as a bolt attachment point.
The RH side forward engine mount was made by an aluminium plate attached to the engine, behind the flywheel. I`m not very proud of the welding on this project today, but I`m getting better 😊
Big, fat SLP twin-pipes:
The Polaris RMK800, with the Liberty engine comes with a single expansion chamber and a 2-1 exhaust manifold as standard. For several reasons, I wanted to install twin pipes. I ordered a set from SLP and a couple of pipes and bends. The pipes are huge! They are at least 130mm wide, and I had to modify them to get enough clearance to ground.
At this point I did not know much about designing expansion chambers. (Not at present either, for that matter) There is very limited space in front of the engine, and I also needed to fit a cooler in front of the pipes. I started with a 90-degree bend from the cylinder and mostly cut, angled and welded the pipes together with the same longitudinal length and width.
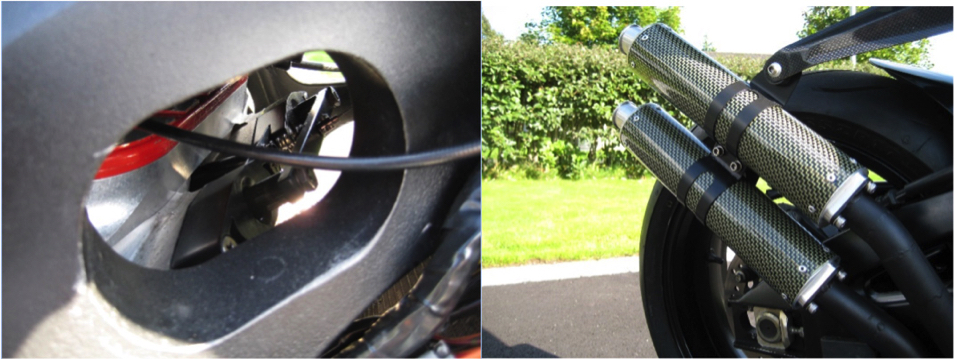
The silencers where bought from Tyga and they where initially designed to fit the Aprilia RS500 project bike, if anyone remember. They had a large inner diameter and where 70mm in diameter. The sound the engine makes is incredible. It sounds like a RD350 on steroids 😊
Pneumatic exhaust valves have been modified to be operated by a Yamaha YPVS Servo. I`m not very found of the Yamaha servo. Somehow, it`s much worse than the Suzuki RGV servo to operate, at least when using together with the Ignitech CDI.
Chain, sprocket, wheel and Street bike?
I had to modify the chain carrier on the rear wheel to get a straight line from front sprocket to rear sprocket. The output axle for the front sprocket could be a bit further back, but not possible with the HD tranny.
My initial goal with this project was actually to make a street bike! I used most of the Suzuki wiring and removed the injection part. I installed a starter gear outside the flywheel and an electrical starter from a newer Yamaha snowmobile, If I remember correct. I welded an aluminium box for a smaller battery which was installed under the engine. A little push on the button, and the engine started right away! Man, this was starting to get really cool 😊
Friends and other people who heard about the project came to see it and I was very proud of what I had achieved! At this point I was not on Facebook.
Oil pump and water pump:
I decided to use the standard Mikuni oil pump instead of using per-mix. To make the engine less wide, I re-located it to sit within the frame of the bike. It is driven by a pulley on the crankshaft, a pulley on the pump itself and the std toothed belt for driving the water pump. Water pump is a separate, electrical pump of the same reason as above. To reduce the total width of the engine.
You could run pre-mix on the engine, but if you do, Polaris recommends to improve wholes in engine case above bearings for lubrication purposes.
HEAVY Vibrations:
The large capacity twin snowmobile engines have massive pistons. The 800 pistons weighs over 500grams each. This does limit the max rpm to 8.400rpm, and you sure understand why when revving it! The handle bars vibrated so bad that you could barely hold on to them. My starter and battery box almost came off, and I was afraid of what would happened to my non-flexible exhaust system. I understood that something had to be done to reduce the vibrations.
In a Polaris sled, the engine is installed in a cradle with 4 large rubber dampers and there is of course a reason for this. Since I don`t have any experience with sleds (or Harley Davidson for that matter), I contacted a guy which used a twin cylinder snowmobile in a drag bike. He told me that if the engine cannot vibrate freely, the crankshaft could actually brake because of the heavy vibrations. In some twin cylinder jet-ski engines, you can actually find a balance shaft which reduces the vibrations.
In an attempt to improve the situation, I removed the starter gear, starter and battery box from the engine. I managed to install 20mm wide rubber dampers between frame and engine. This helped a lot. The bike was now more of a track bike than a street bike, and it is still, though I have the Lithuanian registration papers for it. The engine still vibrates, and worse on some rpm`s than others, but it is much better than without rubber dampers. If you read about testing the Tularis bike, they also experienced a lot of vibrations. I guess you just have to accept it on this kind of project.
Ignition, electrics and carburetor:
I have kept the Polaris ignition pick-up and the alternator and flywheel. The CDI has been replaced by a programmable Ignitech DC-CDI-P2 Race type CDI. It has a 12V battery, a Bosch electric water pump, a Yamaha YPVS servo.
The engine has the std Mikuni 40mm carbs. It has V-force reeds and SLP head with inserts. In a sled configuration, this set-up is said to make 164hp 😊 The bike weighs 160kg.
Status per today:
As I mentioned in the beginning of the story, I have several projects going on at the same time. Unfortunately, I have not been able to test the bike on track, not even on a Dyno. However, it would be very fun to bring the bike to a trackday sometime!
There is one thing left to sort out before using the bike on track. Unaware of the challenges with the vibrations, I made the exhaust connection between pipe and cylinder stiff. The pipe has a flange which is attached to the cylinders by 3 bolts. This attachment MUST be made flexible. If not, it will brake or damage the cylinder attachment.